Installation and configuration of Oracle RAC is always challenging task even for an experienced dba.
I read a story saying that a database administrator will laugh at you if you ask him to create a workable RAC of 2 nodes within a week.
Oracle RAC is definitely complex environment but is it so difficult and time consuming to deploy ?
To find an answer, I decided to try install Oracle RAC 10.2 on my small computer with 2 GB RAM. I used VMWARE server to create the environment of 2 linux nodes, that concurrently access shared database on cluster file system OCFS2.
I took me not one week but nearly 4 day(s), during which, I have solved various encountered problems. Below are some notes that you need to consider before attempting similarly
Documentation
http://www.oracle-base.com/articles/rac/ArticlesRac.php
http://www.dbasupport.com/oracle/ora10g/index_RAC.shtml
These two freely available resources are quite good, concise and practical beside
metalink and official manual.
Summary of problems
Believe or not, the fact is that most of problems are rooted from
- mis-configuration of hardware and OS: without time synchronization between nodes, Clusterware misbehaves
- not install latest patch: many things suddenly work after installing latest patch
Oracle RAC document is generally not good
- it is huge and verbose: the Oracle Clusterware and Oracle Real Application Clusters Administration and Deployment Guide 10g Release 2 (P/N: B14197-08) is 400 pages thick
- knowledge is split across many metalink notes making it difficult in orientation: to understand why we need proper setting of default gateway for a public network interface and its role, we need search metalink more than once
- It is usually difficult and expensive to create environment for practical testing
The RAC software stack
RAC Software stack consists of 2 layers sitting on top of OS
a. RDBMS: Oracle RDBMS with RAC as Option
b. Clusterware: CRS – Cluster Ready Service
c. Operating System: Linux, Windows, AIX
By implementing CRS component to play a role of Clusterware, Oracle wants to remove dependency of RAC from Clusterware traditionally provided OS and third party vendor.
CRS need two device(s)/file(s) to store it's data; voting disk and oracle cluster registry - OCR . Because only one CRS is needed to support multi database(s), it is good to keep voting disk and OCR in a location independent from location for a database files.
VMWARE Server configuration
To experiment with Oracle Clusterware, also called Cluster Ready Service (CRS) and RAC, we need VMWARE Server. VMWARE Workstation does not work because it does not support concurrent access to a share disk.
The config file (*.vmx) of each node shall be specially modified to disable disk locking and cache. By doing it, a hard disk created as file on host system can be safely attached to 2 VMWARE nodes. An example of special setting is taken from
Oracle RAC Installation on VMWARE article given below
...
...
disk.locking = "FALSE"
diskLib.dataCacheMaxSize = "0"
diskLib.dataCacheMaxReadAheadSize = "0"
diskLib.dataCacheMinReadAheadSize = "0"
diskLib.dataCachePageSize = "4096"
diskLib.maxUnsyncedWrites = "0"

scsi1.present = "TRUE"
scsi1.virtualDev = "lsilogic"
scsi1.sharedBus = "VIRTUAL"
...
...
Network setting
RAC requires at least 2 NIC per node, one for private network and one for public network. Private network is used for communication between nodes while public network is for serving clients.
In case of public network RAC does not use the host IP address for client communication but what it calls service or virtual IP address (VIP). In the public network, the VIP address has the same netmask as the host IP address, it is managed (assigned/un-assigned to the NIC) by Cluster Ready Service - CRS so in case of failure of one node, the VIP address of the fail node will be move to surviving one by CRS.
It is good to follow some naming convention for host name. Example is given below
/etc/hosts
# public
190.2.4.100             rac1 rac1-en0
190.2.4.101             rac2 rac2-en0

# private
9.2.4.100               rac1-priv rac1-en1
9.2.4.101               rac2-priv rac2-en1

# virtual
190.2.4.200             rac1-vip
190.2.4.201             rac2-vip
CRS need a gateway assigned to a public network interface in order to reliably detect failure of NIC and node. It is important to use a IP of a live machine reachable from all nodes but it is not necessarily a gateway.
Enabling remote shell (RSH) and login (RLOGIN)
Oracle Universal Installer (OUI) uses RSH and RLOGIN to install software on multi nodes, which means we run OUI only on one node and it will automatically copy the software (CRS and RAC) and configure on other nodes. Other configuration programs as VIPCA, NETCA and DBCA also work similarly and depend on RSH and RLOGIN to perform remote operation.
Therefore we need to enable RSH and RLOGIN on all nodes before running installation program. The example below demonstrate how to enable RSH and RLOGIN.
Configure RSH
[root@rac1 ~]# rpm -q -a | grep rsh
rsh-0.17-25.4
rsh-server-0.17-25.4

[root@rac1 ~]# cat /etc/xinetd.d/rsh
# default: on
# description: The rshd server is the server for the rcmd(3) routine and, \
#       consequently, for the rsh(1) program.  The server provides \
#       remote execution facilities with authentication based on \
#       privileged port numbers from trusted hosts.
service shell
{
        disable = no
        socket_type             = stream
        wait                    = no
        user                    = root
        log_on_success          += USERID
        log_on_failure          += USERID
        server                  = /usr/sbin/in.rshd
}
Configure RLOGIN
[root@rac1 ~]# cat /etc/xinetd.d/rlogin
# default: on
# description: rlogind is the server for the rlogin(1) program.  The server \
#       provides a remote login facility with authentication based on \
#       privileged port numbers from trusted hosts.
service login
{
        disable = no
        socket_type             = stream
        wait                    = no
        user                    = root
        log_on_success          += USERID
        log_on_failure          += USERID
        server                  = /usr/sbin/in.rlogind
}
Start RSH and RLOGIN
[root@rac2 ~]# chkconfig rsh on
[root@rac2 ~]# chkconfig rlogin on
[root@rac2 ~]# service xinetd reload
Create oracle account and enable RSH and RLOGIN for oracle on node rac1 and rac2
#Create the /etc/hosts.equiv file as the root user.
[root@rac2 ~]# touch /etc/hosts.equiv
[root@rac2 ~]# useradd oracle
[root@rac1 ~]# useradd oracle

[root@rac[1,2] ~]# cat /etc/hosts.equiv
+rac1 oracle
+rac2 oracle
+rac1-priv oracle
+rac2-priv oracle
+rac1-vip oracle
+rac2-vip oracle

[root@rac[1,2] ~]# chmod 600 /etc/hosts.equiv
[root@rac[1,2] ~]# chown root:root /etc/hosts.equiv
Verify RSH and RLOGIN
[oracle@rac2 ~]$ rsh rac1 “uname –a”
[oracle@rac1 ~]$ rsh rac2 “uname –a”
[oracle@rac1 ~]$ rlogin rac2
[oracle@rac2 ~]$ rlogin rac1
Configure Network Time Protocol - NTP
Oracle clusterware CRS use time from nodes for it activities, so keeping time synchronized on all nodes is required. The clock synchronization method on unix is using NTP services, in which a machine contact other with preciser clock a reference clock, on regular interval to retrieve time and update its own clock.
In the following example, node rac1 is used as reference clock while rac2 use rac1 as it's reference clock. Sometime this configuration does work well due to the reason that VMWARE hypervisor provide very bad clock implementation, therefore it is recommended to use an external physical server as reference clock , if we can have connection to Internet then use one of available real reference clocks.
[root@rac1 ~]# more /etc/ntp.conf
server  127.127.1.0     # local clock
fudge   127.127.1.0 stratum 10 refid LCL

[root@rac1 ~]# /etc/init.d/ntpd restart
Shutting down ntpd:                                        [  OK  ]
Starting ntpd:                                             [  OK  ]
[root@rac1 ~]# chkconfig ntpd on

[root@rac2 ~]# more /etc/ntp.conf
server  rac1     # remote clock

[root@rac2 ~]# /etc/init.d/ntpd restart
Shutting down ntpd:                                        [  OK  ]
Starting ntpd:                                             [  OK  ]

[root@rac2 ~]# chkconfig ntpd on

[root@rac2 ~]# /usr/sbin/ntpdate -v -d rac1 # verify reference clock rac1
Turn off firewall
CRS communication between nodes happens via TCP and UDP, so it is important to turn off firewall in all nodes to allow inter nodes traffic.
[root@rac1 ~]# /etc/init.d/iptable stop
[root@rac1 ~]# chkconfig iptable off
[root@rac2 ~]# /etc/init.d/iptable stop
[root@rac2 ~]# chkconfig iptable off
Install, configure cluster file system - OCFS2
RAC use shared disk architecture, in which all nodes have to access (for both read and write) to a same collection of database and others files located in a external hard disk. There are few options, one is to keep these files on raw devices, which is usually quite painful due to it's complex administration ranging from creation to maintenance. Other option is store them on file system, because traditional unix file system don't allow access from multi nodes, we need a special one, a cluster file system. There are different cluster file system available for different OS, e.g. GFS on AIX, Oracle has implemented a cluster file system on LINUX called OCFS2.
Install OCFS2 is fairly simple and easy
[root@rac1 ~]# rpm -q -a | grep ocfs2
ocfs2-2.6.9-42.ELsmp-1.2.9-1.el4
ocfs2-tools-1.2.7-1.el4
ocfs2console-1.2.7-1.el4

[root@rac2 ~]# rpm -q -a | grep ocfs2
ocfs2-2.6.9-42.ELsmp-1.2.9-1.el4
ocfs2-tools-1.2.7-1.el4
ocfs2console-1.2.7-1.el4
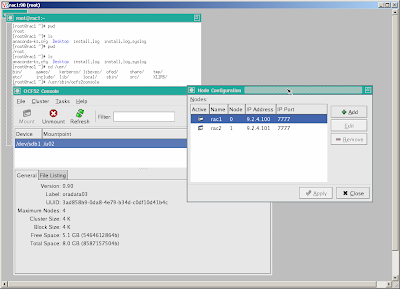
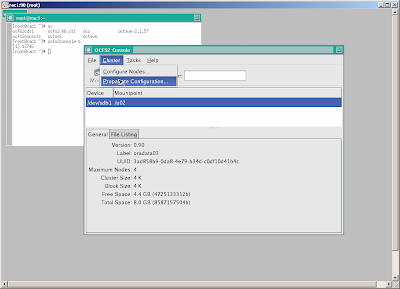
To create a configuration run ocfs2console and follow GUI menu
[root@rac2 ~]# /usr/sbin/ocfs2console
Define a configuration of two nodes rac1, rac2 using IP on private NIC en1 and specified port

Propagate the configuration to other node

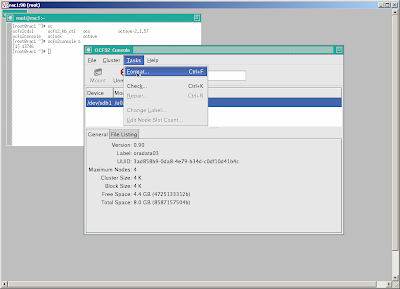
Create and format cluster file system, note that we shall create a cluster filesystem on a shared disk, that is accessible from both nodes.
[root@rac1 ~]#fdisk /dev/sdb
...  #create single partition sdb1
...
Use ocfs2console=>task=>format /dev/sdb1

Start OCFS2 services and mount cluster file system at startup
[root@rac[1,2] ~]#chkconfig --add o2cb
[root@rac[1,2] ~]#chkconfig --add ocfs2
[root@rac[1,2] ~]#/etc/init.d/o2cb configure

[root@rac[1,2] ~]#cat /etc/fstab:
...
/dev/sdb1  /u02  ocfs2    rw,_netdev,datavolume,nointr,heartbeat=local 0 0

[root@rac[1,2] ~]#mkdir /u02
[root@rac[1,2] ~]#mount /u02
Verify cluster file system by creating a directory on one node and check if it appears on other node.
[root@rac1~]#mkdir –p /u02/crsdata
[root@rac1~]#mkdir –p /u02/oradata
[root@rac2~]#ls –l /u02
crsdata
oradata
Modify LINUX kernel setting to meet OCRS,and ORACLE requirements
For the first node
[root@rac1]~]# vi /etc/sysctl.conf
kernel.shmall = 2097152
kernel.shmmax = 2147483648
kernel.shmmni = 4096
# semaphores: semmsl, semmns, semopm, semmni
kernel.sem = 250 32000 100 128
fs.file-max = 65536
net.ipv4.ip_local_port_range = 1024 65000
net.core.rmem_default=262144
net.core.rmem_max=262144
net.core.wmem_default=262144
net.core.wmem_max=262144
[root@rac1~]# sysctl -p
[root@rac1]~]# vi /etc/modprobe.conf
options hangcheck-timer hangcheck_tick=30 hangcheck_margin=180
For the second node
[root@rac2~]# vi /etc/sysctl.conf
kernel.shmall = 2097152
kernel.shmmax = 2147483648
kernel.shmmni = 4096
# semaphores: semmsl, semmns, semopm, semmni
kernel.sem = 250 32000 100 128
fs.file-max = 65536
net.ipv4.ip_local_port_range = 1024 65000
net.core.rmem_default=262144
net.core.rmem_max=262144
net.core.wmem_default=262144
net.core.wmem_max=262144
[root@rac2~]# sysctl -p
[root@rac2]~]# vi /etc/modprobe.conf
options hangcheck-timer hangcheck_tick=30 hangcheck_margin=180
Install Oracle Cluster Ready Service - CRS
Create the new groups and users.
[root@rac[1,2]~]#useradd oracle
[root@rac[1,2]~]#groupadd oinstall
[root@rac[1,2]~]#groupadd dba
[root@rac[1,2]~]#usermod -g oinstall -G dba oracle
Create Oracle Cluster Registry - OCR and votedisk on cluster file system
[root@rac1~]#mkdir –p /u02/crsdata
[root@rac1~]#touch /u02/crsdata/ocr.dbf
[root@rac1~]#touch /u02/crsdata/votedisk.dbf
[root@rac1~]#chown –R oracle /u02
Copy installation software
[root@rac1~]#mkdir –p /u02/setup/clusterware10.2.0.1
[root@rac1~]#mkdir –p /u02/setup/oracle10.2.0.1
[root@rac1~]#mkdir –p /u02/setup/patch10.2.0.4
Create home directory for crs and oracle
[root@rac1~]#mkdir –p /u01/crs
[root@rac1~]#mkdir –p /u01/oracle
[root@rac1~]#chown –R oracle /u01
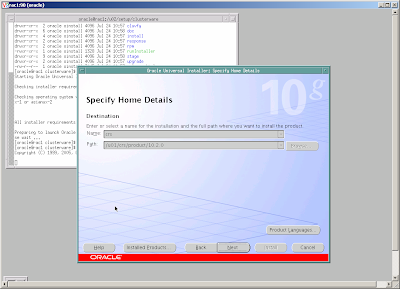
Run Oracle Universal Installer - OUI as oracle
[oracle@rac1~]$/u02/setup/clusterware/runInstaller

Follow instructions and
- add node rac2 to make sure that there are two nodes in the cluster
- for each node specify public node name (rac1, rac2), virtual host name (rac1-vip, rac2-vip) and private node name (rac1-priv, rac2-priv), this is also important to specify an IP of a reliable host of the same public network as gateway.
- specify public network for public and virtual IP and private network for private IP
- specify u02/crsdata/ocr.dbf as OCR and /u02/crsdata/votedisk.dbf as voting disk location and external redundancy
OUI will perform installation on one node then using RSH to copy to other node, during final phase of the installation process, script root.sh shall be invoked manually as root on each node.
At the end, OUI will run virtual IP configuration assistant - VIPCA, that create and persist configuration of VIP, ONS and GSD etc. as resource in OCR.
If for any reason (e.g. mis typing, incorrect IP) VIPCA fails, we can re run it under root after correction.
Install Oracle Database Software and create a database
The installation of Oracle Database Software is similar as for non-RAC version, only different is after completion on one node, the OUI will copy the software to other node.
At the end of this process two configuration programs will be invoked
- a database configuration assistant - DBCA for database creation and
- a network configuration assistant - NETCA for listener and tnsname configuration

 The '-lnc' option of JAD display line number of original source code as comment on the left side of decompiled code so it can be used to identify which part of code cause an exception.


